First Aid Basics Everyone Should Know Before an Emergency
In a real emergency, paramedics may be 10 to 30 minutes away. In a major disaster, they may not come at all. What you do in those first minutes matters more than anything else. The skills in this guide are the difference between saving a life and watching helplessly.
You do not need to be a doctor or paramedic. You need to know the basics. This guide covers what everyone should know, step by step, in plain language.
Why First Aid Knowledge Matters More Than a Kit
Most people focus on buying supplies. They get a first aid kit, put it in a closet, and feel prepared. But when something actually happens, they freeze. They do not know what to do with the supplies they have.
Skills matter more than stuff. A person with first aid training and a clean rag can save more lives than someone with a $500 trauma kit they have never opened.
The good news: first aid is not complicated. The core skills can be learned in an afternoon. You do not need to memorize drug interactions or perform surgery. You need to know:
- How to keep someone alive until help arrives
- How to stop serious bleeding
- When to call for help and what to say
- Basic treatment for common injuries
That is it. Master these, and you are better prepared than 90% of the population.
Why Trust This Guide?
This article was researched and reviewed by contributors with hands-on experience in emergency preparedness. They have tested gear, built real systems, and lived through situations where these skills actually mattered.


The Primary Survey: ABCDE
When you find someone who is injured or unresponsive, your first job is assessment. The ABCDE approach is used by medical professionals worldwide. It gives you a systematic way to check someone’s condition without missing critical problems.
A — Airway
Is the airway open? Can air get into the lungs?
What to check:
- Is the person conscious and talking? If yes, the airway is open.
- If unconscious, look in the mouth for visible obstructions (food, vomit, blood, teeth).
- Listen for abnormal breathing sounds (gurgling, snoring, stridor).
What to do:
- If unconscious but breathing, place in the recovery position (on their side) to keep the airway clear.
- If there is visible obstruction, carefully remove it. Do not push objects deeper.
- If the person is not breathing, tilt the head back and lift the chin to open the airway.
B — Breathing
Is the person breathing? Is breathing adequate?
What to check:
- Look for chest rise and fall.
- Listen for breath sounds near the mouth and nose.
- Feel for air on your cheek.
- Count breaths if possible. Normal is 12-20 breaths per minute for adults.
What to do:
- If breathing normally, continue assessment.
- If not breathing at all, begin CPR (see below).
- If breathing is very slow, shallow, or gasping, prepare for CPR and call 911 immediately.
C — Circulation
Is blood moving through the body? Is there dangerous bleeding?
What to check:
- Check for a pulse. The carotid artery on the side of the neck is easiest to find in an emergency.
- Look for major bleeding anywhere on the body.
- Check skin color and temperature. Pale, cold, sweaty skin suggests shock.
What to do:
- If no pulse and no breathing, begin CPR.
- If there is major bleeding, control it immediately (see bleeding control section).
- If signs of shock, lay the person down, elevate legs if no leg injury, and keep warm.
D — Disability (Neurological)
What is the person’s level of consciousness? Are there signs of head or spine injury?
What to check:
- Are they alert? Do they respond to your voice? Do they respond to pain? Are they unresponsive?
- Check for equal pupil size and reaction to light.
- Ask simple questions (name, location, what happened) to check orientation.
- Look for signs of head injury: blood or fluid from ears or nose, bruising around eyes or behind ears.
What to do:
- If you suspect spine injury, do not move the person unless there is immediate danger.
- If unconscious but breathing, place in recovery position while supporting the head and neck.
- Monitor for changes in consciousness.
E — Exposure
Check the whole body for injuries you might have missed.
What to check:
- Look for wounds, bruising, deformities, swelling.
- Check under clothing if possible and appropriate.
- Check the back if you can do so safely.
What to do:
- Cover and protect any wounds found.
- Keep the person warm with blankets or coats.
- Continue monitoring while waiting for help.
Calling 911: What to Say
Knowing when and how to call for emergency help is itself a critical skill.
When to Call 911
Call immediately for:
- No pulse or not breathing
- Unconscious or unresponsive
- Chest pain or pressure
- Stroke symptoms (face drooping, arm weakness, speech difficulty, time to call)
- Severe allergic reaction (anaphylaxis)
- Serious burns (larger than palm, on face/hands/genitals, or circumferential)
- Severe bleeding that will not stop
- Suspected poisoning
- Seizure lasting more than 5 minutes or first-time seizure
- Suspected spinal injury
- Any life-threatening emergency
What to Tell the Dispatcher
- Your location (address, cross streets, landmarks)
- Phone number you are calling from
- What happened
- Number of people involved
- Condition of the victim(s)
- What help is being provided
- Any hazards at the scene
Stay on the line. The dispatcher may guide you through first aid steps. Do not hang up until they tell you to.
Call First vs. Care First
Call first (get help coming):
- Unwitnessed collapse in an adult
- Any suspected cardiac event
- Drowning (after 1 minute of CPR)
Care first (start CPR immediately):
- Witnessed collapse (you saw them go down)
- Children and infants
- Drowning (give CPR for 1 minute, then call)
- Choking that leads to unconsciousness
If you are alone, use speakerphone so you can call 911 while providing care.
Bleeding Control: Direct Pressure and Beyond
Most bleeding stops with direct pressure. The technique is simple but must be done correctly.
For Wounds That Are Bleeding
Step 1: Protect yourself Put on gloves if available. If no gloves, use plastic bags, multiple layers of cloth, or anything to create a barrier. Blood-borne diseases are real.
Step 2: Apply direct pressure Use a clean cloth, gauze, or whatever is available. Press firmly directly on the wound. Use the palm of your hand for large wounds, fingers for small ones.
Step 3: Do not peek Hold pressure for at least 10 minutes without lifting to check. Peeking disturbs clot formation and restarts bleeding.
Step 4: If blood soaks through Do not remove the first cloth. Add more material on top and continue pressing. Removing the original cloth removes the forming clot.
Step 5: Once bleeding stops Bandage the wound firmly to maintain pressure. Do not bandage so tight that circulation is cut off (check for pulse below the bandage).
For Severe Bleeding on Limbs
If direct pressure does not work, or if bleeding is catastrophic (bright red spurting blood), a tourniquet may be necessary.
When to use a tourniquet:
- Life-threatening bleeding from an arm or leg
- Direct pressure has failed or is not possible
- You cannot reach the wound (trapped limb)
- Mass casualty situation with multiple victims
How to apply a tourniquet:
- Place the tourniquet 2 to 3 inches above the wound (never on a joint).
- Tighten until bleeding stops. This will be very tight and painful.
- Note the time of application. Write it on the tourniquet or the person’s forehead if necessary.
- Do not loosen or remove once applied. This can cause fatal complications.
- Keep the tourniquet visible. Do not cover with blankets.
Modern tourniquets like the CAT (Combat Application Tourniquet) are designed for one-handed application and are far more effective than improvised tourniquets.

1. EVERLIT Emergency Trauma Kit — Best Complete Trauma Kit
This IFAK (Individual First Aid Kit) contains a genuine CAT GEN-7 tourniquet, Israeli bandage, 36-inch splint, and other trauma supplies. The MOLLE-compatible pouch attaches to bags and belts. If you want professional-grade bleeding control equipment, this is the kit.
- Genuine CAT GEN-7 tourniquet
- Israeli pressure bandage
- 36-inch aluminum splint
- Chest seal and wound dressing
- Compact MOLLE-compatible pouch
For Wounds That Cannot Have Direct Pressure
Some wounds are in locations where direct pressure is difficult (junctions of limbs and body, neck, groin). For these:
Wound packing: Push gauze or clean cloth into the wound cavity while maintaining pressure. This technique is taught in Stop the Bleed courses.
Hemostatic agents: Products like QuikClot are impregnated with agents that accelerate clotting. Follow package directions for use.
CPR Basics: Keeping Someone Alive
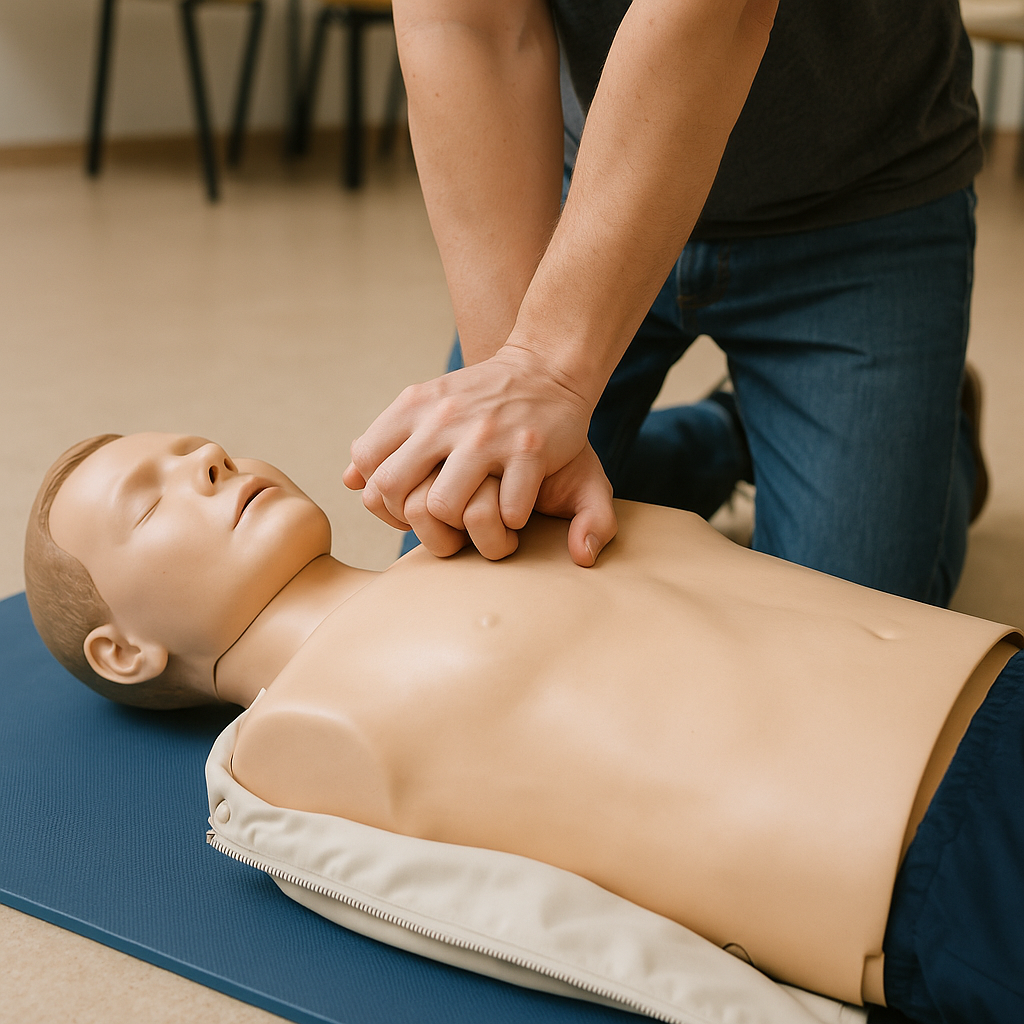
Cardiopulmonary resuscitation (CPR) keeps blood and oxygen moving when the heart stops. Brain damage begins in 4-6 minutes without oxygen. CPR buys time until the heart can be restarted.
Hands-Only CPR
The American Heart Association recommends hands-only CPR for bystanders who are not trained in full CPR. It is simple and highly effective.
Step 1: Check responsiveness Tap shoulders and shout “Are you okay?” If no response, check for breathing.
Step 2: Call 911 If alone, call 911 and put the phone on speaker before starting CPR. If someone else is present, have them call while you start.
Step 3: Start compressions
- Place the heel of one hand on the center of the chest (between the nipples).
- Place your other hand on top, fingers interlaced.
- Position your shoulders directly over your hands.
- Push hard and fast: at least 2 inches deep, at least 100-120 compressions per minute.
- Let the chest fully recoil between compressions.
- The beat of “Stayin’ Alive” by the Bee Gees is approximately 100-120 BPM and makes a good mental metronome.
Step 4: Continue until
- Emergency services take over
- An AED arrives and is ready to use
- The person starts breathing normally
- You are too exhausted to continue
Hands-only CPR more than doubles survival rates for cardiac arrest. Even imperfect CPR is far better than no CPR.
Using an AED (Automated External Defibrillator)
AEDs are found in many public buildings, gyms, airports, and offices. They are designed to be used by anyone with no training.
How to use an AED:
- Turn on the AED. It will give voice instructions.
- Expose the chest. Remove clothing, wipe dry if wet, shave if very hairy (most AEDs include a razor).
- Apply pads as shown in the pictures on the pads. One on upper right chest, one on lower left side.
- Make sure no one is touching the person when the AED analyzes.
- If the AED says “shock advised,” make sure no one is touching the person and press the shock button.
- Immediately resume CPR after the shock. Continue until the AED tells you to stop for another analysis.
AEDs cannot hurt someone who does not need a shock. The device analyzes the heart rhythm and only allows a shock if needed. Do not hesitate to use one.
Choking: The Heimlich Maneuver and More
Choking is one of the most common life-threatening emergencies you might encounter. It is also one of the most treatable if you act quickly.
Recognizing Choking
Mild choking (partial blockage):
- Person can cough, speak, or make noise
- Encourage coughing, do not interfere
- Stay with them and monitor
Severe choking (complete blockage):
- Cannot speak, cough, or breathe
- May clutch throat (universal choking sign)
- Face turning red, then blue
- Needs immediate help
Heimlich Maneuver for Adults and Children Over 1 Year
Step 1: Confirm choking Ask “Are you choking?” If they cannot speak or nod yes, act now.
Step 2: Give 5 back blows Stand to the side and slightly behind. Support the chest with one hand. Give 5 firm blows between the shoulder blades with the heel of your hand.
Step 3: Give 5 abdominal thrusts Stand behind the person. Make a fist and place it just above the navel. Grasp your fist with your other hand. Give 5 quick upward thrusts.
Step 4: Alternate Repeat back blows and abdominal thrusts until the object is expelled or the person becomes unconscious.
If the Person Becomes Unconscious
Lower them to the ground. Call 911 if not already done. Begin CPR. Each time you open the airway to give breaths (if trained), look in the mouth for the object. If you see it, remove it. Do not do blind finger sweeps.
Choking in Infants (Under 1 Year)
Do not use abdominal thrusts on infants. Their organs are too fragile.
Back blows:
- Hold the infant face-down on your forearm, supporting the head.
- Give 5 firm back blows between the shoulder blades.
Chest thrusts:
- Turn infant face-up on your forearm.
- Give 5 chest thrusts using two fingers in the center of the chest.
Alternate 5 back blows and 5 chest thrusts until the object is expelled or the infant becomes unresponsive.
Self-Heimlich
If you are alone and choking:
- Make a fist and place it above your navel.
- Grasp your fist and thrust upward.
- Alternatively, lean over a chair, railing, or countertop and thrust your abdomen against the edge.
Burns: Classification and Treatment
Burns are classified by depth. Treatment varies by severity.
First-Degree Burns (Superficial)
Affects only the outer layer of skin (epidermis). Appears red, dry, and painful. Like a mild sunburn.
Treatment:
- Cool the burn under cool (not cold) running water for 10-20 minutes.
- Do not use ice. Ice can cause frostbite and additional damage.
- Do not apply butter, oil, or toothpaste. These trap heat and increase damage.
- Apply aloe vera or a mild moisturizing lotion after cooling.
- Over-the-counter pain reliever as needed.
- Cover loosely with a sterile bandage if needed.
Second-Degree Burns (Partial Thickness)
Affects the epidermis and part of the dermis. Appears red, wet, and blistered. Very painful.
Treatment:
- Cool under cool running water for 20 minutes.
- Do not pop blisters. They protect against infection.
- Cover loosely with a sterile, non-stick bandage.
- Over-the-counter pain reliever.
- Seek medical attention if: burn is larger than 3 inches, on the face, hands, feet, genitals, or over a major joint, or if it circles a limb.
Third-Degree Burns (Full Thickness)
Destroys both layers of skin and may affect deeper tissues. Appears white, brown, black, or waxy. May be painless (nerve damage).
Treatment:
- Call 911 immediately.
- Do not remove clothing stuck to the burn.
- Cover loosely with a clean, dry cloth.
- Elevate burned area above heart level if possible.
- Monitor for shock.
- Do not apply water to large third-degree burns (hypothermia risk).
Chemical and Electrical Burns
Chemical burns: Remove contaminated clothing. Brush off dry chemicals before flushing with water. Flush with water for at least 20 minutes. Call poison control if chemical is ingested or inhaled.
Electrical burns: Do not touch the person if they are still in contact with the electrical source. Turn off power first. Electrical burns may be deeper than they appear. Always seek medical attention.
Fractures and Sprains
You do not need to diagnose whether an injury is a fracture or a sprain. The first aid treatment is similar: immobilize and seek appropriate care.
Signs of a Possible Fracture
- Deformity (limb looks wrong)
- Swelling and bruising
- Pain with movement or touch
- Inability to bear weight or use the limb
- Crepitus (grinding sensation with movement)
- Shortening of the limb
Basic Immobilization
For arm injuries:
- Support the arm against the body.
- Use a sling made from clothing, triangular bandage, or improvised material.
- Immobilize the joints above and below the injury if possible.
For leg injuries:
- Do not attempt to move the person unless necessary.
- If they must be moved, splint the leg using rigid materials (boards, poles, rolled newspapers) padded with soft material.
- Secure the splint with bandages, belts, or strips of cloth.
- Immobilize the joints above and below the injury.
When to Suspect a Spinal Injury
Assume spinal injury if:
- Fall from height (twice the person’s height or more)
- Diving accident
- Motor vehicle accident
- Any injury with loss of consciousness
- Significant head or neck trauma
- The person complains of neck or back pain
- The person cannot move or feel their extremities
If you suspect spinal injury:
- Do not move the person unless there is immediate danger (fire, structural collapse).
- Keep the head, neck, and spine aligned.
- Place hands on either side of the head to prevent movement.
- Wait for trained help.
Head Injuries
Head injuries range from minor bumps to life-threatening brain trauma. Recognizing when a head injury is serious is critical.
Signs of Concussion
- Headache
- Confusion or disorientation
- Nausea or vomiting
- Dizziness
- Memory loss (especially of the event)
- Sensitivity to light or noise
- Feeling “foggy” or “not right”
Signs of Serious Head Injury (Seek Emergency Care)
- Loss of consciousness (any duration)
- Worsening headache
- Repeated vomiting
- Seizures
- Slurred speech
- Weakness or numbness
- One pupil larger than the other
- Clear fluid or blood from ears or nose
- Severe drowsiness or cannot be awakened
- Confusion that worsens over time
What to Do
For minor head bumps: Apply ice wrapped in cloth. Monitor for 24-48 hours. Wake the person every 2-4 hours to check responsiveness if they are sleeping.
For suspected concussion: Rest, avoid screens and bright lights, seek medical evaluation. Most concussions resolve with rest but require monitoring.
For serious head injury: Call 911. Keep the person still. If unconscious but breathing, place in recovery position while stabilizing the head and neck. Monitor breathing and be prepared for CPR.
Allergic Reactions and Anaphylaxis
Allergic reactions range from mild (hives, itching) to life-threatening (anaphylaxis).
Signs of Anaphylaxis
Anaphylaxis is a severe, whole-body allergic reaction. It can be fatal within minutes. Signs include:
- Swelling of face, lips, tongue, or throat
- Difficulty breathing or swallowing
- Wheezing or stridor
- Hives or widespread rash
- Rapid pulse
- Dizziness or fainting
- Nausea, vomiting, abdominal cramps
- Sense of impending doom
What to Do
Step 1: Call 911 immediately
Step 2: Epinephrine (if available)
- If the person has an EpiPen or similar auto-injector, help them use it or administer it yourself.
- Inject into the outer thigh (through clothing is fine).
- Hold for 10 seconds.
- A second dose may be given after 5-15 minutes if symptoms do not improve.
Step 3: Position appropriately
- If breathing is difficult, let them sit up.
- If they feel faint, lay them down with legs elevated.
- If unconscious but breathing, recovery position.
Step 4: Monitor and support
- Stay with them.
- Be prepared for CPR if needed.
- Keep the used EpiPen to give to paramedics.
Epinephrine Myths
“I might hurt them if I use it wrong.” The risk of not giving epinephrine during anaphylaxis is far greater than any risk from the injection. Err on the side of giving it.
“They said they feel better, so they don’t need the hospital.” Anaphylaxis can have a biphasic reaction, meaning symptoms return hours later. Always seek emergency care after anaphylaxis, even if symptoms improve.
Hypothermia and Heat Stroke
Temperature emergencies are common and often underestimated.
Hypothermia (Too Cold)
Signs:
- Shivering (early stage; stops in severe hypothermia)
- Confusion, slurred speech
- Clumsiness, lack of coordination
- Slow breathing and heart rate
- Pale or blue skin
- Drowsiness progressing to unconsciousness
Treatment:
- Move to a warm environment if possible.
- Remove wet clothing.
- Warm gradually using blankets, body heat, or warm (not hot) packs to the core (chest, neck, groin).
- Give warm, non-alcoholic drinks if fully conscious.
- Handle gently. Rough handling can cause cardiac arrest in severe hypothermia.
- Seek medical attention for moderate to severe cases.
Heat Stroke (Too Hot)
Signs:
- High body temperature (over 103°F / 39.4°C)
- Red, hot, dry skin (may or may not be sweating)
- Rapid, strong pulse
- Headache
- Dizziness
- Nausea
- Confusion
- Loss of consciousness
Treatment:
- Call 911. Heat stroke is a medical emergency.
- Move to a cooler environment.
- Cool rapidly using whatever is available: cool water on skin, ice packs to neck, armpits, and groin, fanning, cool bath or shower if possible.
- Do not give fluids if unconscious.
- Monitor for shock and be prepared for CPR.
Heat stroke can cause permanent brain damage or death. Do not underestimate it.
Shock: Recognition and Treatment
Shock is a life-threatening condition where organs are not getting enough blood flow. It has many causes: severe bleeding, heart problems, severe infection, allergic reactions, and more.
Signs of Shock
- Pale, cold, clammy skin
- Rapid, weak pulse
- Rapid, shallow breathing
- Confusion or anxiety
- Weakness
- Nausea or vomiting
- Thirst
- Dilated pupils
Treatment
- Call 911.
- Lay the person down.
- Elevate the legs about 12 inches unless there is a head, neck, back, or leg injury.
- Cover with a blanket to prevent heat loss.
- Do not give food or drink.
- Treat any obvious cause (stop bleeding, treat burns, etc.).
- Monitor breathing and be prepared for CPR.
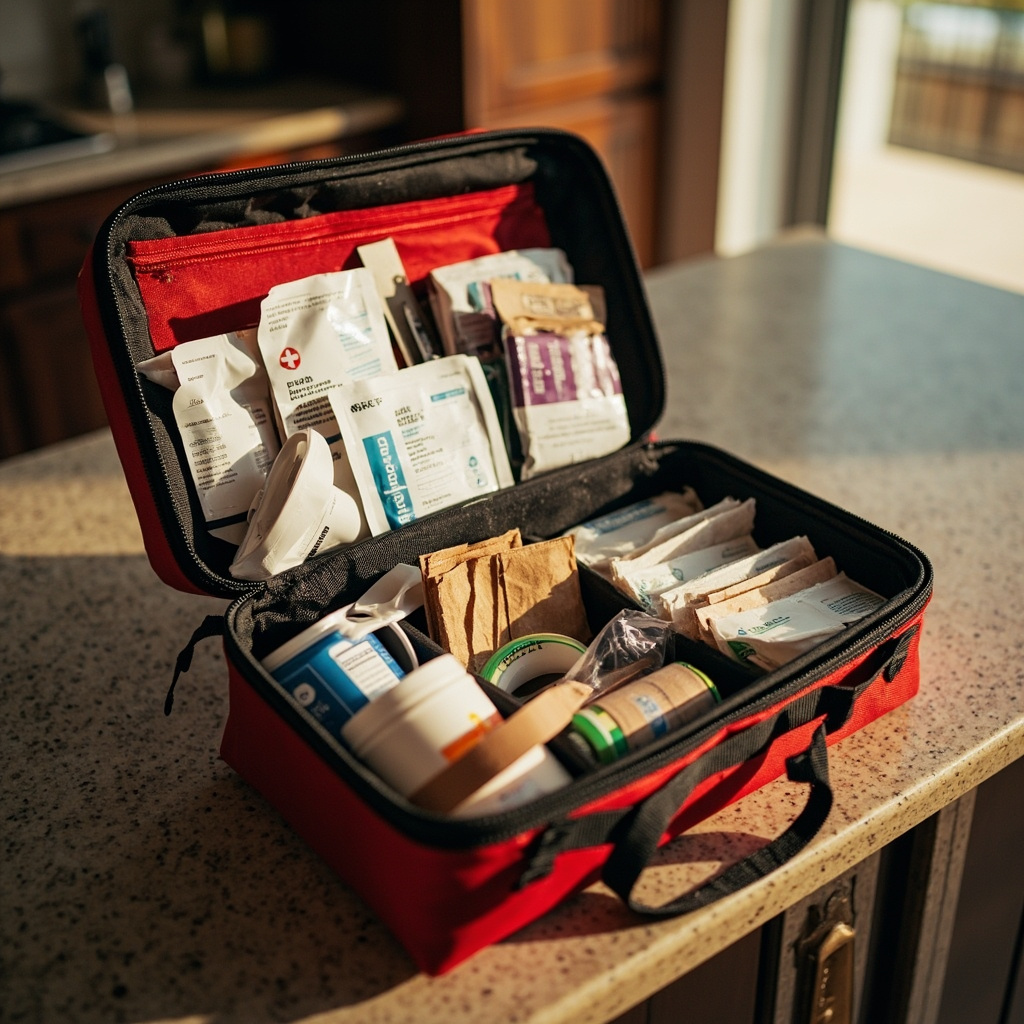
Building Your First Aid Kit
A well-stocked first aid kit supports the skills you have learned. Here is what to include:
Basic Supplies
- Adhesive bandages (assorted sizes)
- Sterile gauze pads (various sizes)
- Gauze rolls
- Medical tape
- Elastic bandage (ACE wrap)
- Triangular bandage (sling)
- Scissors
- Tweezers
- Disposable gloves (at least 2 pairs)
- Instant cold pack
- Thermometer
- CPR face shield or pocket mask
- First aid manual
Wound Care
- Antiseptic wipes or solution
- Antibiotic ointment
- Non-stick sterile pads
- Butterfly closures or Steri-Strips
Medications
- Pain relievers (ibuprofen, acetaminophen)
- Antihistamine (diphenhydramine)
- Antidiarrheal
- Antacid
- Hydrocortisone cream
- Personal prescription medications
Advanced/Trauma Supplies
- Tourniquet (CAT or similar)
- Israeli bandage or pressure dressing
- Hemostatic gauze (QuikClot)
- Chest seals (if trained)
- SAM splint or improvised splinting materials

2. EVERLIT 250 Piece Survival First Aid Kit — Best All-Around Home Kit
This comprehensive kit includes 250 pieces covering basic first aid, wound care, and survival gear. The MOLLE-compatible pouch organizes everything for quick access. A solid foundation that you can supplement with trauma supplies.
- 250 pieces including bandages, gauze, medications
- Organized MOLLE-compatible pouch
- Includes survival gear (flashlight, paracord, emergency blanket)
- Good for home, car, camping
Taking a Real Class
Reading about first aid is a start. Taking a hands-on class is better. Practice on mannequins and simulated scenarios builds confidence and muscle memory.
Recommended Training
CPR and AED (2-4 hours): American Heart Association or American Red Cross courses are widely available. Learn hands-on CPR and AED use. Certification is often required for certain jobs.
Basic First Aid (4-8 hours): Covers wound care, burns, fractures, medical emergencies. Combined with CPR for a full-day course.
Stop the Bleed (2 hours): Focuses specifically on bleeding control and tourniquet use. Free classes available through stopthebleed.org.
Wilderness First Aid (16-20 hours): Extended training for situations where professional help is hours or days away. Great for hikers, campers, and remote workers.
Frequently Asked Questions
What is the most important thing to learn? CPR. Cardiac arrest kills more people than any other emergency, and bystander CPR dramatically improves survival. Learn hands-only CPR first, then build from there.
Should I worry about being sued if I help someone? Good Samaritan laws protect people who provide reasonable emergency care in good faith. These laws exist in all 50 US states. Do not let fear of liability stop you from helping.
How do I know if I should move an injured person? Generally, do not move someone unless there is immediate danger (fire, structural collapse, traffic). If you must move them, try to keep the head, neck, and spine aligned.
What if I do CPR wrong? Imperfect CPR is far better than no CPR. Even if your hand position is slightly off or your compressions are not deep enough, you are still moving blood. The worst thing you can do is nothing.
Should I remove an object stuck in a wound? No. Embedded objects often plug the wound and slow bleeding. Leave them in place and stabilize with bulky dressings around the object. Let medical professionals remove it.
How often should I refresh my training? CPR certifications typically expire after 2 years. Even without formal recertification, practice and review yearly. Skills fade without reinforcement.
Is there an app that can help in an emergency? The American Red Cross First Aid app provides step-by-step instructions for common emergencies. Having it on your phone can guide you through unfamiliar situations.
The Bottom Line
You do not need to be a medical professional. You need to know the basics:
- ABCDE assessment — systematically check Airway, Breathing, Circulation, Disability, Exposure
- Call 911 — know when and what to say
- Stop bleeding — direct pressure, tourniquets when needed
- CPR — push hard and fast in the center of the chest
- Choking — back blows and abdominal thrusts
- Burns — cool with water, cover loosely
- Recognize emergencies — know when something needs professional help
Learn these. Practice them. Have the supplies to support them. When something happens, you will know what to do while everyone else freezes.
First aid saves lives. Yours might be the hands that make the difference.